Reload FlashAir
Latest update: May 2018
Overview
In this tutorial, we will reload FlashAir and explain how to make your OS recognize a file modified by Lua scripts/upload.cgi
Problems
FlashAir can create and delete files using Lua scripts and upload.cgi.
When this happens, if the OS of the SD memory card host caches the contents of the SD memory card, the OS will not recognize the change. This means if you change out the SD card, a FAT inconsistency may occur.
Once you remove from the SD memory card host device and reinsert it, you can reload the contents of the SD memory card to the SD memory card host device. However, you may want to re-recognize directly without touching FlashAir, such as when operating FlashAir from a remote place.
In this tutorial, we will explain to how to physically remerge FlashAir, remount it, and reload it to the OS. When reading and writing files on FlashAir from the OS after creating or deleting files with Lua script or upload.cgi, it is a good idea to reread the contents of the card to OS by the method described in this tutorial.
Important point
- If you do not want to write from the SD memory card host side while reloading FlashAir by the method to be described later, you can apply write restrictions with upload.cgi.
- This restriction on writing is canceled by restarting FlashAir and reloading it.
For Windows
Reconnect the removable disk using
devcon.exe tool.
- Since devcon.exe is included in the Windows Driver Kit, first download the Windows Driver Kit from the following URL and install it.
- Connect FlashAir to Windows PC using SD memory card host equipment such as SD card reader or SD card throttle attached to the PC itself.
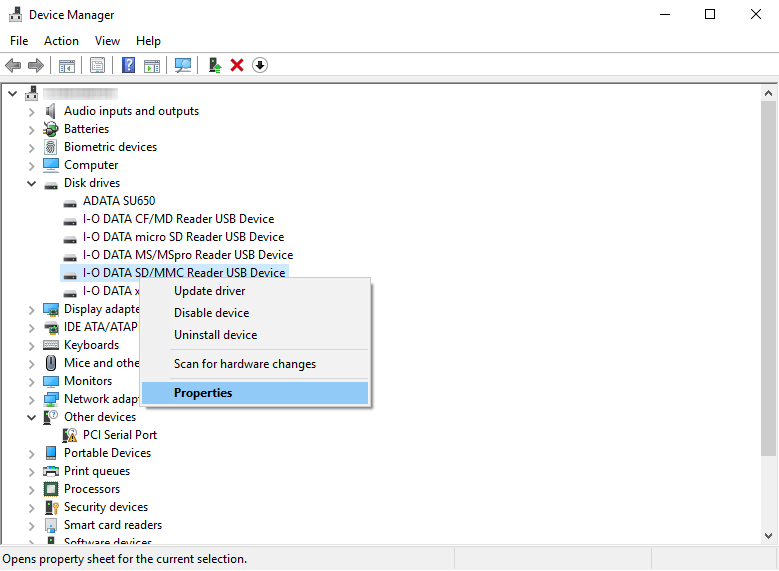
- Check the hardware ID of the SD memory card host device connected from the device manager.
- On the Device Manager, right-click the SD memory card host device and click Properties.

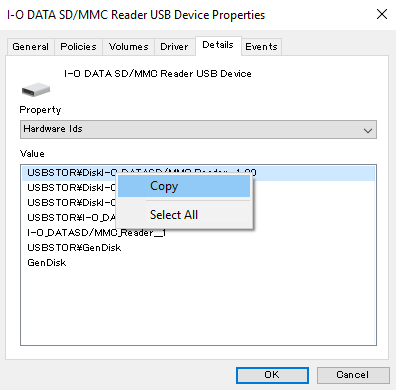
- Select the Hardware Ids in the properties in the details tab and copy the value.

- Run PowerShell or Command Prompt as administrator and execute the following command.
※It is an example of 64 bit version Windows 10. Please read the path as appropriate according to the installation environment. -
cd "C:\Program Files (x86)\Windows Kits\10\Tools\x64" -
devcon.exe restart <Hardware ID>
For Linux
Use the command mount , umount . Also install the library to load the SD card.
- Install the library to read and write exFAT format with the following command.
※If already installed, you can skip this step. - For Red Hat-based distributions
-
sudo yum install exfat-fuse exfat-utils - For the debian type distribution
-
sudo apt-get install exfat-fuse exfat-utils - Execute the following command with FlashAir connected and disconnected, respectively, and verify what the device name is recognized by the OS.
-
sudo fdisk -l - Information on the device will be output as below, so please check the difference between the output when connecting FlashAir and when it is disconnected.
-
$ sudo fdisk -l
(Omission)
Device         Boot  Start      End  Sectors  Size Id Type
/dev/mmcblkOp1        8192   131971   122880   60M  c w95 FAT32 (LBA)
/dev/mmcblkOp2      131072 15564799 15433728  7.4G 83 Linux
(Omission)
Device     Boot Start      End  Sectors  Size Id Type
/dev/sdb1        8192 30228479 30220288 14.4G  c w95 FAT32 (LBA)
- In the above case, FlashAir is recognized as
/dev/sdb1. - Mount FlashAir. If it is mounted automatically, skip this step.
- To check if it is mounted, execute the
dfcommand and check whether there is the device name examined above. - If it is not mounted, execute the following command and mount it. In this example, it is assumed that the
device
of
/dev/sdb1is mounted on/mnt/flashair. -
sudo mkdir /mnt/flashair -
mouont /dev/sdb1 /mnt/flashair - Reconnect FlashAir by executing the following commands in order.
-
umount /dev/sdb1 -
mount /dev/sdb1 /mnt/flashair
For macOS
Use the command diskutil to reconnect the device.
- With the FlashAir connected, execute the following command from the terminal and check the device name recognized by the OS.
-
diskutil list -
$ diskutil list /dev/disk0 (internal, physical): #: TYPE NAME SIZE IDENTIFIER 0: GUID_partition_scheme *251.0 GB disk0 1: EFI EFI 209.7 MB disk0s1 2: Apple_APFS Container disk1 250.8 GB disk0s2 /dev/disk1 (synthesized): #: TYPE NAME SIZE IDENTIFIER 0: APFS Container Scheme - +250.8 GB disk1 Physical Store disk0s2 1: APFS Volume Macintosh HD 160.0 GB disk1s1 2: APFS Volume Preboot 21.3 MB disk1s2 3: APFS Volume Recovery 517.8 MB disk1s3 4: APFS Volume VM 3.2 GB disk1s4 /dev/disk2 (external, physical): #: TYPE NAME SIZE IDENTIFIER 0: FDisk_partition_scheme *15.5 GB disk2 1: Windows_FAT_32 NO NAME 15.5 GB disk2s1 - In the above case, FlashAir's device name is recognized as
disk2s1. - Reconnect FlshAir by executing the following commands in order.
-
diskutil umount <Device name> -
diskutil mount <Device name>
 FlashAir™ Developers